Correct technique and execution for squats
Squats or squats are probably the most important exercise in the entire training repertoire of a strength athlete (or strength athlete!) . If you don’t agree, you’ve never done a proper squat or integrated it into your strength training as an integral part of your training. Very easily. Discussion ended.
For this reason, the correct technique for squats is of fundamental importance for the health-oriented and progressive development of your own performance in squats and similar disciplines.
Before we venture into the actual technique and exercise execution for squats, we would like to first discuss why squats are so important for a balanced and effective strength training and should not be missing in any training plan!
Why are squats so important and so exhausting?
Squats are an incredibly effective exercise that can not only progressively and continuously increase the maximum strength of an athlete, but also the level of adaptation of speed strength, strength endurance and the actual muscle mass – which is almost linear with the individual strength level of an athlete – can significantly increase and thus make a decisive contribution to training success. You sprint faster, jump further and higher and have an extremely stable “core”.
Why are squats so effective now?
Well, this is mainly due to the complex and therefore very natural movement pattern that the athlete must complete when performing the squat exercise. For comparison, let’s take a quick look at the training on stationary devices:
Here it is so that the respective muscle group is targeted and isolated from the rest of the body can be trained. Regardless of whether it is a calf extension, triceps machine or back extension – these exercises are basically also very effective and effective and, depending on the training and state of health, may be necessary – but have absolutely nothing to do with the natural sequence of movements that we do Humans have had to complete it every day for thousands of years and were learned from our ancestors in sometimes painful experiences with well-fortified mammoths.
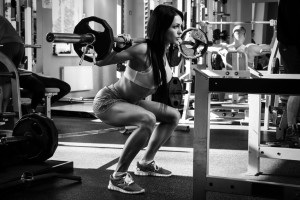
This firm ass is only thanks to disciplined squats. Wonderful sight, isn’t it?
In everyday life it almost never happens that individual muscle groups are stimulated completely isolated from each other. Thus, any movement sequence that does not address the functional systems that are shaped by evolutionary biology, including the human skeletal muscles, is quite unnatural. Or have you ever tried to build a pyramid with just your triceps?
Squats let us return to a fairly natural movement pattern!
The movement pattern required for the squat in the exercise is incredibly complex. The squat is one of the few muscle building exercises that enables the so-called hip drive movement pattern , in which the “rear muscle chain” is specifically trained.
This muscle chain is made up of all muscles that contribute to hip extension as a composite unit , i.e. which make stretching and bending the hip possible. This is particularly important when we are in the maximally bent position during the squat, from which we can return to the original position with the help of the gluteal muscles, the hamstring muscles, the adductors, the back extensor and the abdominal muscles Move the starting position of the squat .
This effective stimulation of the basic muscles involved and the so-called “core” are the secret of the squat. While a few decades ago in the middle-class fitness world countless sit-ups, back straighteners and leg machines provided the all-important “core training”, this task can be replaced almost without replacement by training with squats from a training physiological point of view.
The effective core training (core and abdominal muscle training) through squats
As mentioned, squats provide a very important muscle hypertrophy in the torso area of an athlete, through which not only the back and abdominal muscles are massively strengthened, but also active support and the spine Experience stabilization through the strengthened “core muscle groups” .
This anatomical influence not only protects the spine better against mechanical damage (injuries) that can occur in everyday life or during training, but also improves overall physical performance, sometimes drastically.
You will not only become stronger and more productive, tone your legs, your buttocks and your torso, but you will also be able to cope with everyday demands much more efficiently and gently with a comparable movement pattern.
Seriously, squats are an elementary training basis. Women in particular should move more and more from the stepper under the barbell so that the countless buttocks and legs that can be optimized finally get a tight and sexy shape!
Mechanical and physiological peculiarities when performing the exercise
Almost all types of squat, i.e. high-bar back squats, low-bar back squats and front squats in particular stimulate the quadriceps femoris in a very effective way and reliably ensure the regular and continuous development of massive muscle soreness, regardless of the level of training there is an athlete.
The reason for this is the mechanical stress that is placed on the athlete during squat. While the rear muscle chain consists of several muscles , which are able to generously distribute the forces acting on all muscles involved in the event of intense stress through hip extension under load (e.g. with a barbell on the upper back), the quadriceps must Cope with the entire load on your own when the knee is extended. A grueling task that rarely works without sore muscles. Respect, big guy!
So it is of the utmost importance that we use all muscle groups involved in the exercise as optimally and as evenly as possible so that no motor units are overloaded. To do that, we need to consider a few factors so that we can get the most out of our squats:
- The physical ability to balance with a barbell has to be given so far that training with progressively increasing weights is possible and the technique does not suffer
- The musculoskeletal system (ligaments, tendons, joints) must have adequate mobility with which a technically correct execution of the exercise is possible and – if not – possibly adapted through targeted mobility training until the necessary mobility is available
- The basic force must be sufficient to be able to complete the first squats with the initial load (a conventional barbell weighs around 20kg) (alternatively, there are also smaller barbells that women in particular can use well for starting squat training)
- Muscle coordination must be advanced and practiced to such an extent that individual muscles of the posterior chain can be focused and isolated, tensed or relaxed
- The breathing pattern (Valsalva method) must start completely automatically and routinely in the event of stress
If these factors are met, we can start the actual squat exercise and learn the technique that enables us to use all muscle groups involved in a targeted and even manner and optimally exploits the strength potential of the rear muscle chain. Only with the perfect technique can every athlete reach their personal performance limits and thus aim for maximum training success!
One of the most popular and best squat variants is the Low-Bar Back Squat , on which we have focused clearly in these exercise instructions. So let’s get started!
The Low Bar Back Squat – The optimal squat variant
This variant of the squat meets all the important criteria that an ideal basic exercise should have. The LBBS not only stimulates many large muscle groups and can therefore be described as an effective compound exercise or whole-body exercise, but also manages to fully recruit the rear muscle chain, which in these often neglected muscle groups provides an optimal hypertrophy stimulus is set.
In contrast to the high-bar version, the bar in the low-bar back squat lies further down on the back, from an anatomical point of view, directly under the shoulder bone. The following illustration shows the position of the barbell in relation to the metatarsus and the difference to the high bar version, in which the barbell is placed on the upper trapezius.
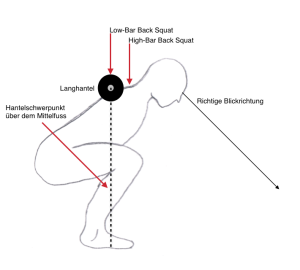
Fig. 1 makes it clear what the difference is between the LBBS and HBBS variants of the squat. Important: Position the LH over the metatarsus!
What is the difference to the high bar version?
As you may have already noticed, our focus here is on training the back chain. The high bar squat shifts the load more to the front thigh . The high bar squats can also be effectively implemented as strength training, but from our point of view the LBBS is much more suitable for a targeted strengthening of the back muscles.
From a mechanical point of view, there is another reason for the LBBS variant . Because, in contrast to the high bar version, the more horizontal back angle, the open knee angle and the closed hip angle push the pelvis significantly more behind the point of equilibrium above our metatarsus, the respective lever arm, i.e. the distance between the vertical force application point (barbell) and the pivot point ( Joints) larger in LBB squat than in HBB squat.
So we can (must!) activate significantly more muscle mass with this variant in order to enable the lifting of the dumbbell and thus we can also move heavier weights. Ergo: make faster progress.
Basically, the difference between the front and back squat variants is primarily the back angle, which of course is determined by the dumbbell position.
Physical characteristics of the squat
In the world of the squat, all physical laws come into play in full force. That was a brilliant transition to a small experiment. Do you have a broom near you? Take it in your hand, lift it up to chest height and let it go. What do you notice?
Right. The broom falls on the floor. Of course, you could have carried out the entire experiment with an apple, as our physics genius Newton would have done in your place. Gravitation or gravity is the reason why you can even do the dumbbell training.
It doesn’t matter at what height, at what angle or in what position an object or dumbbell is. If the path is clear, it will always fall perpendicular to the earth’s surface until suitable resistance stops it. This resistance can also be a force in the opposite direction with the same amount. You can exercise this power. For example with a squat against the dumbbell weight.
The simplest (i.e. the shortest or most energetically efficient) path on which an object can be moved from point A to B is the straight line. With the squat, this means: A straight line in the up and down movement that is not left . The following illustration shows you an ideal starting position of the barbell, which is used in an LBBS.
In the figure it becomes clear how your body’s center of gravity shifts very clearly in the direction of the dumbbell when you place a dumbbell on it. The heavier the dumbbell, the higher the center of gravity moves until it is almost at the dumbbell . We are neglecting the slight deviation in the horizontal shift in the center of gravity at this point.
At the same time, the higher the center of gravity moves, the more difficult it is to get the barbell in a straight line over the metatarsus to move up and down when changing posture. This is due in particular to a physical law that becomes noticeable very drastically: The lever arm .
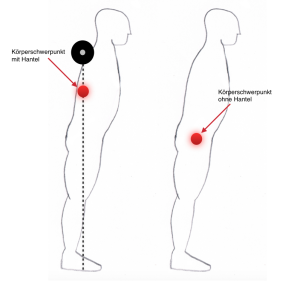
Fig. Figure 2 shows the effects of barbell intake. The center of gravity shifts significantly in the direction of the barbell
To demonstrate this law, you can pick up the broom from just now and hold it directly behind the broom head. Extend your arm and hold the broom in the air for a few seconds. No problem, right?
Now you grab the broom at the outer end of the handle and try again to fully extend your arm. The broom head (center of gravity of the broom) is now at the maximum distance from your pivot point, the shoulder joint (in mechanics it would be the support) and exerts a torque on your shoulder that makes it almost impossible to hold the broom with your outstretched arm for a long time hold. Welcome to the world of physics. Welcome to the lever arm.
Why is the lever arm so important for the squat?
The wrong expression is important. When squat, you should keep the lever arm as low as possible. Ideally, the torque in the support (hip) in the starting position (static holding position) = 0, i.e. there is no lever arm.
Only then can you focus all your strength on lifting the dumbbell vertically and you don’t have to work against a force that is not only vertical. In the actual exercise, however, a lever arm is created, which is also desired and necessary.
So hold the dumbbell above your center of gravity if possible and make sure that it never leaves the “ideal line” of your center of gravity even during the exercise. This also applies to all other basic exercises such as the deadlift or the bench press.
The correct technique of the low-bar squat
Now we come to the actual technique of the squat, which basically also applies to all other variants of the squat. Only when we look at the explicit technique does the importance of lever arm and dumbbell position become clear.
The right stance for squats
The correct position of the feet and the precise positioning of the barbell work very closely together. Not only the angular position of the feet (toes) and the positioning of the LH center of gravity above the metatarsus must be correct, but also the standing width. Okay, here are the most important criteria that a technically optimal level of squat should meet:
- Angle position of the toes compared to the verse about 30 ° outwards
- Stance of the verses should be shoulder width apart , possibly also a little wider. A broader stance causes the knees to be pulled back further when you bend, a closer stance causes them to be pulled forward further. The stance must be chosen for the squat at least so that the collateral ligaments and main tendon of the knee do not experience any torsion or twist during a bend
- If the mobility in the hips and knees is not yet adequately developed, another stand can make the squats easier for the beginning
- With bow legs the toes have to point a little more outward, with knock knees a little less, so that the anatomically and mechanically optimal relationship between shin and thigh is maintained can be
The position of the squat is a very individual matter. There is no such thing as a “right” or “wrong” stand if the general guidelines are followed.
Depending on the length of the torso, thigh and lower leg, the ideal standing position can be completely different from athlete to athlete. The overhang of the knees to the toes is also a very individual matter!
The handle and bar position of the barbell
As already mentioned, in the low-bar version of the squat, the barbell lies on the shoulder blade, directly under the shoulder bone. In the high-bar version, the dumbbell rests on the upper trapezius, which is the muscle that clearly emerges when the neck muscles are tensed and the shoulders are pushed back.
The grip width should be about a shoulder width + 1-2 hand widths per side. The wider the grip, the less tension can be built up in the upper back muscles.
You should therefore urgently avoid a grip that is too wide, because the pressure load at the point of contact of the barbell is absorbed so much by your skeletal muscles , which of course does not have an adequate damping effect, such as your back and trapezoid muscles can. Pain is inevitable.
The front squat is also a very popular variant of the squat, but much more vulnerable for mistakes and injuries as the low-bar variant
The wrists should be in a straight line with the forearm and not kinked. Incidentally, the thumbs do not have to fully grip the barbell, as is the case with the bench press, for example, but only have to secure it before it slips backwards. Or have you ever seen the barbell fall unexpectedly up against the ceiling when doing a squat ..?
Probably the most critical point is the positioning of the barbell directly above the metatarsus . Only in this way can the dumbbell be optimally balanced in relation to the body’s center of gravity and develop the least (= no) leverage in the starting position.
Body and head posture for squats
Of course, posture also plays an important role in squat. Anyone who acts like a slackly filled sandbag when picking up the barbell and collapses at the first touch of the cold steel will neither master a technically correct exercise nor achieve the necessary stability for a progressive weight gain .
The head must assume a position in which the gaze is directed to the ground at a distance of about 1-2 meters from the standpoint. Tip: A tennis ball clamped between the chin and the base of the neck may look shitty, but it gives you a good feeling for the correct head position when squatting.
The starting position when lifting the barbell must enable a stable guidance of the dumbbell by specifically tensing the trunk and back muscles, while the athlete takes as few steps backwards (!) as possible into the correct position after lifting the barbell.
NEVER, really NEVER move forward out of a squat rack and put the bar back down. You neither see where you are going, nor can the extreme overstretching of your spine increase your life expectancy! I just put the barbell forward into the dumbbell holder. Please read this sentence aloud 1000 times.
Proper breathing for squats
Squats require a perfect breathing technique, which is not only performance-determining, but primarily fulfills anatomical functions. The targeted application of the so-called Valsalva method (via the link you can find our detailed article on this topic) fulfills exactly this function.
Brief version of the Valsalva method
Take a deep breath and tense your abdominal muscles before every heavy work session. The increased lung and stomach pressure presses on the vertebrae and stabilizes the entire spine during the squat. In the static holding position or after having overcome the lowest point in the upper third of the upward movement, exhale with compressed breathing. The illustration shows once more the effect of correct breathing.

Let’s get down to business: the right technique for performing the exercise
Perfect, you have now mastered the basics of posture, breathing and the grip and bar position for the squat. So we can now start the actual exercise execution. We start with step 1 and work through the important points in the execution of the squat step by step.
A little tip in advance: Especially after increasing the weights, it can be advisable to stand under the dumbbell and vigorously against the weight before the actual work set to stem. This gives you a good feeling for the necessary resistance and the strength that you have to apply to lift the dumbbell.
When doing squats, is it harmful to go deeper than 90 degrees? You can’t generalize that, but basically you should go as deep as possible on your squats. The said 90 ° position is often even more stressful for the knees than a much lower position. Ligaments, tendons and joints are at right angles in an anatomically unfavorable position that can cause significantly higher stress peaks.
So: The deeper you go, the better it is!
- After picking up the barbell , move backwards with as few steps as possible to the starting position . Backwards because it is often not technically possible otherwise (equipment in the way) and when lowering you only have to slide the dumbbell forward against the holder
- The downward movement : the trunk, back, thighs and buttocks are tense and you slowly begin to bend. It helps to imagine a chair that is positioned behind you and should serve as a seat, while the position of your feet and the straight line (slightly hollow back) in the spine does not change
- You make sure that the position of the barbell is consistently in line with your metatarsus . The speed should not be too fast so that the intense tension in your hamstrings (thighs) as well as your stomach and back is not lost
- The line of sight is still directed about 1-2m in front of the standing position (on the floor), while the thighs pass the point parallel to the floor
- When you reach the lowest point (this is often anatomically conditioned and depends on the stance) you do not bob, but keep the tension in all muscle groups. You can also go further down when your stomach is already touching your thighs
- If you have the right speed you should be able to hold your breath at this point.
- Now things are looking up again! With maximum body tension you fight against rounding your back and try to keep your torso and back as stable as possible! A light hollow back, which reflects the natural “S-shape” of the spine, can help exceptionally.
- An explosive development of strength from a crouch catapults you into the upward movement at a moderately fast speed. You shouldn’t bob, but start the upward movement again as soon as possible after reaching the lowest point so that the load on the knees does not become too great and you can take advantage of the so-called “bounce” . Due to the stretching of the rear chain and thighs, your body expects an intense muscle contraction. The greater the stretch, the more powerful the upward movement can be if you find the right starting point.
- In the upward movement , you constantly make sure that the center of gravity of the dumbbell is still above your metatarsus!
- Important: The upward movement is primarily a hip movement. This must not be directed forward under any circumstances, but must be directed explosively in the vertical upward movement
- During the entire upward movement of the squat, the chest is directed forward, while the shoulder is straight and (due to the position and grip of the barbell) retracted position
- In the upper third of the upward movement you can now exhale extremely forcefully, go back to the starting position, check your body tension again, take a deep breath and start in round 2!
Videos of a good squat exercise
We have put together two really good squat designs for you. The first video is primarily about the actual technique and anatomical differences, while the second video perfectly depicts the execution of all three movement states. Have fun studying the videos!
Colleague Joe Paleo also goes into the anatomical features between different athletes. Not everyone is the same …
Oliver Heuler’s video is based on the methods described in Mark Rippetoe’s masterpiece (“Starting Strength”), on which our guide is based. Very nicely explained.
Watch these videos again and again, go to work out and use our guide and the information from the videos. So you can work on your individual and perfect technique, which you should of course have a trainer control from a neutral point of view.
Common mistakes with squats
Probably the most common mistake when squat is a rounded back (“butt wink”), which can occur due to many factors. This overview shows you the possible causes:
- The dumbbell is simply incorrectly positioned on your back and develops an immense leverage effect on your hips, which you can no longer support with your muscles
- Lack of body tension in the torso area (abdominal muscles), which is responsible for insufficient stability in the hip area and can lead to butt wink
- The hip flexor (lower back) is not trained, tense or deactivated. Sitting too much or physiologically poor sitting and sleeping positions can cause the hip flexor to stop working for the time being. In this case, you have to get the hip flexor functional again through targeted training
- Your basic mobility is not enough for clean technology. In particular, a lack of mobility in the ankle can lead to poor technique. In this case, you can gradually increase mobility with suitable stretching methods
- Also in general imbalance for the barbell and your body can cause errors in execution. Solution: Practice with light weights until you can keep the optimal balance
- The wrong viewing direction . Anyone who has to constantly look in the mirror while squatting is most likely assuming a completely wrong head position. Think about the tennis ball! If you don’t look down, you destroy your hip drive!
- Lack of spatial perception for the temporary position of the training device, extremities and one’s own posture (kinesthetic perception)
The squat stretch – stretching for squats
Well developed mobility in the trunk area and in the legs is the fundamental prerequisite for the correct execution of the exercise. However, if you have problems with the anatomically correct position at the lowest point, you should optimize your mobility with the appropriate stretching method until a correct execution is possible.
To do this, go into the described starting position of the squat (without weights) and start the downward movement until you have reached the lowest point . When the back of your thighs touch your calves, you are deep enough.
Now fold your hands and press your elbows against the inside of your knees until you feel a stretching effect. This usually occurs when the alignment or direction of your knees is the same as that of your feet. The optimal position.
You take this position for about 20-60 seconds, relax again in the starting position and repeat the stretching for a few times until no more adequate stretching effect can be observed. You use this method over several training units until you can easily get into this position with the (heavy) barbell.
Now it’s your turn!
You now know what the correct squat technique should look like. You know the ideal breathing technique and have a good idea of what to look for when doing squats . Now it is your turn. Implement the squat training in your training plan, let your execution control and achieve impressive results.
Squats are an elementary training basis and belong in every training plan. No matter whether you want to shape your cracking ass as a woman or as a man want to build up massive leg and core muscles. Squats are THE tool of all!